August 22, 2010

Flower Pot Minis & Devilishly Delicious Chocolate Cupcakes


Even though it was over 90 degrees in my kitchen the night I made these, and the buttercream frosting melted a bit, I still thought these were fun to make. I bought half a dozen small flower pots at Michael's (also available at any other craft store). Topping the cupcakes with flower petals of frosting, and centering a small pearl frosting, I then placed the mini cupcakes into the flower pots. These are cute, and I'm looking forward to trying it again when my kitchen isn't so stinking hot. (You can also do these with regular cupcakes and larger flower pots). 

Anyway, here's the recipe for the "Devilishly Delicious Chocolate Cupcakes" - courtesy of the wrapper for Nestle Bittersweet Chocolate Melting Bars. Thought I'd share:-)

Ingredients:
4 oz. bittersweet chocolate baking bar, broken into small pieces (62% cacao)
1 cup all-purpose flour
1/4 cup unsweetened cocoa powder
1/2 tsp. baking soda
1/4 tsp. salt
1/2 cup buttermilk
1/4 cup water
1 cup packed light brown sugar
1/2 cup vegetable oil
3 large eggs
1/2 tsp vanilla extract

Preheat oven to 350 degrees. Line 14 muffin cups.

Melt chocolate (either microwave in small, uncovered bowl, or on the stove - place a bowl over a pot of simmering water). Let chocolate cool to room temperature.

Combine flour, cocoa powder, baking soda, and salt in small bowl.

Combine buttermilk and water in small glass bowl.

Beat brown sugar, oil, eggs and vanilla extract in large mixer bowl on high for 2 minutes.

Beat in melted chocolate.

Beat flour mixture into creamed mixture alternately with buttermilk mixture.

Spoon into prepared muffin cups, filling 3/4 full.

Bake for 18-23 minutes or until wooden pick comes out clean. Cool in pan for 10 minutes; remove to wire rack to cool completely before frosting.

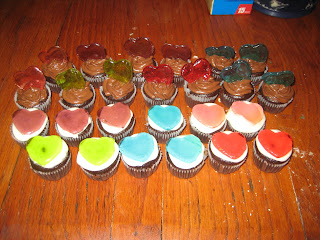
These are yummy and chocolaty:-) Enjoy!

August 17, 2010

Stained Glass Heart Cupcakes


These mini cupcakes are decorated with "stained glass hearts," which are actually quite easy to make. The ingredient? Jolly Ranchers! When I first read about this method of making edible stained glass, I was informed that crushing the candies into small pieces would make it easier. I found this to be completely false; it just got messy. So I skipped that step. I put some tinfoil on a baking sheet, and simply lined up Jolly Ranchers of the same color in two rows, about 1/4 inch apart from each other. I put them in the oven at 350 degrees for 3-4 minutes. This melted them down to a bubbling (very hot!) liquid. I let them cool for 1-2 minutes, and then pressed small heart cookie-cutters into the liquid. After waiting another 2-3 minutes, I pressed the cookie cutters into the hardening candy, reprinting the previous imprint. After breaking away the edges, this process creates beautiful "stained glass" shapes (you can do this with any shape/size cookie cutter.) I then placed them on top of the mini cupcakes (recipe to follow soon) and ta-da! Easy but beautiful decorations.

Here's a picture of the hearts cooling:

Another method of making shapes like this - crush up the candies (I'm sure there's a way to do this without making a huge mess - I just have yet to find it), and place them inside cookie cutters. Melt in the oven (at the above-mentioned temp & time). You won't be wasting any candy this way, but you'll need multiple cookie cutters.

Enjoy!

August 10, 2010

Guiness Cookies

 
Guiness Cookies
I found this recipe on another blog, so instead of re-writing it I am just going to post the link. These cookies were dark and rich, with a Guinness bitter flavor afterward. My husband, who is not a fan of Guinness, did not like these cookies at all. Our other friends, who love the beer, thought they were amazing. I agree with them. These are great for that "something different" if you're tired of same-old chocolate chip. The cookies are chewy and full of flavor. They got a lot bigger than I expected, but it might have been the baking sheets I have (sometimes they cause cookies to flatten out more than I expect.) The hardest part of this recipe was reducing the beer - it took a lot longer than the recipe says (maybe I'm just an idiot), but once it finally finished it was exactly 1/3 cup, just what I needed.


Here's the link to the other (better) blog that has the recipe:

I sprinkled mine with a bit of powdered sugar, just for fun.