February 21, 2011

Owl Cupcakes

I made these guys to display at our Outdoor Education booth during a teacher conference last November. They helped in getting people to stop by our booth that normally would not have, and it gave me an opportunity fuse two of my passions together. Here's how I did them:


You can use any kind of cupcake, although I recommend chocolate. You will also need a nice, thick chocolate frosting to help hold things together. I put a base layer of chocolate frosting down first.

The eyes are Oreos. Simply put a couple of Oreos in the microwave for 10-30 seconds (depending on how many you put in at a time). Your goal is to soften the cream, not melt it! Once it's soft, separate the cookies so one side has cream and the other does not. This can be challenging if you get a stubborn Oreo. I used a paring knife to help guide the cream, and if it breaks up a bit, I just patched it back together while it was still warm.

Put a little frosting on the back of the cream-side Oreos, and place on the cupcake.

The irises are chocolate melting wafers, although Junior Mints will work, too. Again, a little frosting on the back and stick them on the Oreo to make whatever kind of expression you want. You can add a white frosting dot for the pupil. if desired.

For the ears, use the "naked" Oreo halves. Simply cut them in half and use frosting to adhere them to the top part of the cupcake (make sure you overlap enough onto the cupcake so they don't fall off!)

The nose is a banana Runt. (My husband particularly enjoyed this part - since I bought a whole batch of Runts and only used the bananas, it left plenty for him to eat!)

To make the "fur", use a small circular tip and pipe tiny sections. You want to pay particular attention to the ears, and I recommend doing at least around the edges. You can cover the entire face in fur if you're that patient (I did this for a few of them and then ran out of time and patience, so just did the edges.)


You can also do this with mini cupcakes, using mini Oreos and Junior Mints, to create a whole owl family.

Enjoy!

February 19, 2011

The Ultimate Chocolate Frosting

I love chocolate. I love frosting. I love chocolate frosting. But for the most part, homemade chocolate frosting usually leaves me feeling... well, not in love! I've tried several. Some have been horrible, and I have not posted them. Others have been passable, and good for unique reasons (for example, the one used in the Halloween Haunted House was really thick and fudgy, stiff enough to sit out all day on display and really hold onto sprinkles or other decorations). But that delicate, light chocolate frosting that I love to eat straight out of store bought cans eluded me on the homemade front... until I found this recipe. It was originally billed as an icing for cookies, but with a simple modification it has become my new go-to chocolate frosting recipe. This way, I get all the taste satisfaction of the store-bought frosting, without all of the crazy preservatives and chemicals that go into them. I always find that things taste extra-good when you can pronounce all of the ingredients!

THE ULTIMATE CHOCOLATE FROSTING
  • 1/4 cup butter
  • 2 cups confectioners' sugar
  • 3 tablespoons cocoa powder
  • 1 teaspoon vanilla extract
  • 2-4 tablespoons milk
  • 1-2 oz. unsweetened chocolate, melted
Mix together all the ingredients (start with just 2 tablespoons of milk). Slowly add more milk as needed to reach desired consistency.

The only modifications I made to the cookie icing recipe were to add a little more milk, and unsweetened chocolate. I find that solely using cocoa doesn't allow for a very rich chocolate flavor, so adding the unsweetened melting chocolate helps round it out.

Enjoy!


February 15, 2011

Red Velvet Cupcakes

While this post may appear to be about the cupcakes, the star of this creation is really the frosting. Before making this recipe, I had only eaten red velvet cake once before. Since I'm not a big fan of artificial coloring, I was hesitant to make it, but when Valentine's Day came around, the desire for lots of red just overwhelmed me and I gave in...


 For the cake, which was very moist and very red:
  • 1/2 cup shortening
  • 1 1/2 cups white sugar
  • 2 eggs
  • 2 tablespoons cocoa
  • 2 - 4 tablespoons red food coloring
  • 1 teaspoon salt
  • 1 teaspoon vanilla extract
  • 1 cup buttermilk
  • 2 1/2 cups sifted all-purpose flour
  • 1 1/2 teaspoons baking soda
  • 1 tablespoon distilled white vinegar

This recipe makes about 24-27 cupcakes, or a two-layer 9" round cake.
Preheat oven to 350 degrees. Grease pans or fill cupcake pans with paper liners.

Cream shortening and sugar together very well. Add eggs and beat well.

Make a paste of cocoa and red food coloring. (NOTE: the original recipe I found said to use 4 tablespoons, which I used. The cupcakes were bright red, and ended up having a slight aftertaste that I attribute to the massive amount of artificial coloring. I'd recommend starting with a lesser amount of color, and then if you don't get the desired red tint, or the cake doesn't seem moist enough, add more sparingly.)

Add paste to shortening & sugar mixture.

Mix salt, vanilla, and buttermilk together. Alternate adding this & the flour into the creamed mixture.

Now here's the fun part: mix baking soda and vinegar together. Add gently to cake, and fold into batter. Be careful, and work quickly! This is what actually causes the cake to rise, so you don't want to delay too long after adding these to get your cake into the oven.

Fill cupcake liners 2/3 full. Bake for 15 minutes. Check every 2-3 minutes thereafter. If you bake this cake too long, it will be very dry, so check it early and check it often. (I know this goes against conventional wisdom about the cake falling when you open the oven door, but I didn't seem to experience any adverse effects.) 


For the most amazing icing I've ever tasted in my life:
  • 5 tablespoons of flour
  • 1 cup milk
  • 1 cup white sugar
  • 1 cup butter
  • 1 teaspoon vanilla
Combine flour & milk, and cook over low heat until thick, stirring constantly. This process takes a while. You want it thick enough to form a paste, with no runny liquid to be seen. Once thick, remove from heat and allow to cool completely at room temperature.
Cream sugar, butter, and vanilla together for 10-20 minutes. WHAT? I'm sure you must think this is overkill, but trust me - this recipe uses granular sugar, not confectioner's sugar like most frosting recipes. Creaming the mixture for such a long time helps eliminate any sugar grit in the finished product, and makes the frosting extra light. (Thank goodness for my Kitchenaid! I put it on to cream and then was able to wash almost all of my baking dishes AND frost another batch of cupcakes while I waited for this mixture to fully cream.)

Add flour mixture (now completely cool) to sugar mixture, and beat until a good consistency. (If you add them together before the flour mixture cools, your frosting will be runny!)

Put onto a completely cooled cake, and enjoy! This icing is incredibly light, and many people have suggested it is the traditional frosting for red velvet cake (as opposed to the popular cream cheese frosting, which is really best for carrot cakes and spice cakes). I thought the lightness of the frosting helped highlight the moistness and cocoa flavor in the red velvet cupcakes. It melts on your tongue, and was absolutely divine. If you're willing to put the work into it, it's well worth it!


November 19, 2010

Boston Cream Cupcakes

This recipe is one of my absolute favorites. I am not a huge fan of Boston Cream Pie because I feel that the cake-filling-chocolate ratio is off (I feel even more strongly about this in BCP donuts - ughhh). These cupcakes solve that by allowing the perfect proportion (in my mind, at least!) It is mostly cupcake - a yummy vanilla cupcake that is dense and not too sweet. Then there's vanilla pudding for the filling (and you can add as much or as little of this as you want, depending on your ratio preference - I stick with the recommended 1 tablespoon), and a semi-sweet chocolate glaze. This recipe originally came from a Women's Day magazine, but I made some modifications over the several times I've baked these so they end up "just right."

Without further ado...

Step 1: Filling
1 - 3 oz package of cook & serve vanilla pudding
1 1/4 cups milk
1/2 tsp vanilla

Prepare pudding as package directs, using 1 1/4 cups of milk. Scrape into a bowl; cover surface directly with plastic wrap and refrigerate until cold.

Step 2: Cupcakes:
2 1/2 cups all-purpose flour
3/4 tsp baking soda
1/2 tsp baking powder
1/2 tsp salt
3/4 cup unsalted butter, softened
1 1/4 cups sugar
3 large eggs
2 tsp vanilla
1 cup buttermilk

Preheat oven to 350 degrees.
In a bowl, whisk flour, baking soda, baking powder, and salt until blended.
Beat butter & sugar together in large bowl until light & fluffy. Add eggs, one at a time, until well blended. Beat in vanilla extract.
With mixer on low speed, alternately beat in flour mixture and buttermilk, beginning and ending with flour mixture, until just blended.
Spoon about 1/4 cup batter into each muffin cup. Bake 18 to 20 minutes, or until toothpick inserted into center comes out clean. Cool 5 minutes, remove from pan to wire rack to cool completely.

Step 3: Chocolate Glaze
8 oz semi sweet chocolate, chopped (about 1 1/2 cups chocolate chips)
1/3 cup sugar
1/3 cup water
3 tablespoons unsalted butter, softened

Place chocolate, sugar, and water in a small saucepan over low heat.
Cook, stirring, until melted and smooth - about 3 minutes.
Remove from heat; stir in butter until it melts and mixture is smooth. Let cool.
(I've found it very helpful to put it in the fridge for a while to thicken it up - at room temp, it will take a while to thicken up and it will just run off the side of the cupcake.)
Step 4: Assembly
Slice top off of cupcakes to come to top of paper liners.
Spread cut surface with about 1 tablespoon filling.
Top with cupcake top.
Spoon about 1 tablespoon glaze onto top center of each, easing it over top. (Do this slowly so it won't drip quickly off the sides!)

Enjoy!

November 15, 2010

Fall Cut-out Cookies


I can't believe how negligent I've been! I didn't realize I hadn't yet posted up about my fall cookies - and now winter is just right around the corner. In mid-September, I got very excited about slightly cooler temperatures and the upcoming promise of colorful leaves, pumpkin picking, and all-things-Halloween. I made almost 100 cut-out cookies to celebrate the season:

The recipe was pretty simple, but absolutely delicious: 

15 tablespoons unsalted butter, at room temp
1 cup & 2 tablespoons sugar
1 egg, beaten
1/2 teaspoon vanilla
a pinch of salt
3 1/2 cups flour, sifted, plus extra for dusting

Cream together the butter & sugar until light and creamy. Add the beaten egg, vanilla, and salt. Mix well.

Slowly add the flour and mix. Bring together into a dough, then flatten into a disk. Wrap in plastic wrap and refrigerate for 2 hours.

Roll the dough onto a lightly floured surface. Aim for a thickness of about 1/8 inch.

Using a cookie cutter, cut out the shapes you desire. The size of the cutter will determine how many cookies you can get from one batch. Gather scraps, reform into a ball, roll out again, and keep cutting!

Once all shapes have been established, refrigerate them for another 15 minutes. 

Preheat oven to 350 degrees.

Bake the cookies on the middle shelf for about 12 minutes or until firm. Let cool on the sheets for about 10 minutes before transferring to a wire rack to finish cool. (Let them cool ALL the way before you even think of frosting them!) These cookies will keep for 3 days in an airtight box, and for 24 hours once frosted.

Cookies cooling.
Now, for the frosting - a simple royal icing works just fine. The recipe for that:

2 egg whites
4 - 4 1/2 cups confectioner's sugar, sift

Beat the egg whites until foamy using a whisk. Gradually add the sugar and whisk until desired stiffness is reached.

(You can also use buttercream frosting, but it will be softer and won't set well for stacking)


Using coloring gels and an assortment of candies & sprinkles, decorate as desired!

Candy corn, Indian corn, & mellow cream pumpkins make for excellent additions!
   
What I thought was a pumpkin cookie cutter was actually an apple cookie cutter. To my dismay, I had to use massive amounts of red gel to get the apples "apple red" and then they tasted absolutely disgusting. Fortunately, the pumpkins turned out rather well!

 
The Mummy family. Their eyes are made out of red hots.
Enjoy!

November 11, 2010

Chocolate Almond Cake

Back in September, my amazing mother had a birthday. I can thank my mom for many things, including my sweet tooth, and I wanted to bake something in honor of her. I claim no expertise when it comes to baking cakes - I don't have the patience for it, really, and cakes aren't quite as forgiving as cupcakes - but I was eager to make a "proper" birthday cake. 


My mom enjoys almost everything chocolate, but particular enjoys chocolate almond ice cream. Not being able to transport an ice cream cake for her birthday, I attempted to make a chocolate almond cake. Using the double chocolate cake recipe that I posted around the 4th of July (Double Chocolate Cupcakes & Homemade Vanilla Buttercream), and adding a simple twist on the buttercream frosting (instead of vanilla, I added almond extract), I created this cake:


The icing itself was white, so I tinted it using coloring gel. I always feel like brown gives the illusion of more chocolate (the only problem with coloring gels is that they change color in about 24 hours, so the frosting eventually looked more peanut-buttery than chocolaty.) I then topped it with almond slivers, chocolate shavings, and chocolate-covered rum balls that my husband has nicknamed "cannonballs". (Okay, to be honest, I was trying to use up some of the extra toppings I had laying around, and fortunately my mother is VERY forgiving about the appearance of cake!) But despite its odd decorating theme, it was delicious and the good balance of chocolate & almond that I was going for. :-)


November 7, 2010

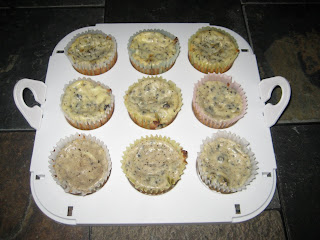
Easy Mini Oreo Cheesecakes


It's been a while since I've posted - almost two months! During that time, I've been working a lot of hours in my "real" job, while baking on the side. Now that the crazy schedule at work has slowed down, the next few weeks will be catch-up of pictures & recipes. I've decided to start with this super simple mini Oreo Cheesecake!


Ingredients:
*2 - 8oz packages of cream cheese, softened
*1/2 cup sugar
*2 eggs
*12 whole Oreo cookies & some additional crushed cookies
*3 oz. semi-sweet baking chocolate (optional)
*1 cup thawed whipped topping (optional)

Preheat oven to 350 degrees.

Beat cream cheese and sugar in large bowl with mixer until well blended.

Add eggs, 1 at a time, beating on low speed after each just until blended. 

Fold crushed cookies into batter (optional).

Place 1 cookie in bottom of each of 12 paper-lined muffin cups. Fill with batter. 

Bake 20 minutes or until centers are almost set. Let stand to cool.

Refrigerate 3 hours. 

Optional: Drizzle melted chocolate and top with whipped topping. (I opted not to do this step because I am not a fan of whipped topping; however, you could really add any kind of topping that you wanted to this - strawberries, chocolate, white chocolate, etc. I'm a minimalist when it comes to Oreo Cheesecake and just wanted to keep it simple).


Enjoy!