May 26, 2010

Oreo Balls


Alright, I'll admit - the name is not very glamorous. Nor are these, in fact, cupcakes. However, they have become a house favorite ever since my mother-in-law tasted them at an office party almost two years ago, and we attempted to make them for a New Year's party. They are relatively simple, and absolutely delicious! This recipe makes a lot of them, but they'll be gone before you know it, guaranteed!

1 package Oreos (or generics; don't use double-stuffed though!)
1 8-oz package of cream cheese, softened
Melting/coating/dipping chocolate

Crush the cookies into indiscernible bits. If you have a food processor, this is easy. However, if you don't, there are many creative ways to crush up the cookies. Here a few pictures of my nephews helping me last year with their various creative methods:

Isaac went for the foot-stomping method (don't worry; they're double-bagged!) while Nathan watches, confused.


Ezra decided to crush them with the corner of a lid. He eventually just placed the entire lid on top and jumped up and down on them.


And sweet Joel, after discovering that his hands didn't crush well enough, decided to use a broom. Only, he used the wrong part and just ended up "sweeping" the bag of cookies instead of crushing them.

(Warning: when crushing cookies in ziplocs, especially with children, always double-bag, and let as much air out as possible or you will have a cookie explosion!)

Now, thanks to my KitchenAid food processor, the cookie-crushing process goes much faster, but is slightly less entertaining.

Anyway, crush up almost the entire bag of cookies (save a few out for eating - about five or six - because Oreos rock).

Soften the package of cream cheese, and then mix the crushed cookies and the cream cheese together very well. Form into 1-2 inch balls, put on wax paper, and refrigerate for about an hour.

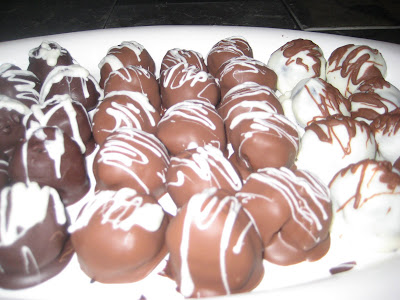
Using a variety of melting chocolate, dip each ball into the melted chocolate and set on wax paper to cool. I usually use dark chocolate, but this week I also added milk chocolate and white chocolate to the mix. Refrigerate until ready to serve (best when served cool, although can be enjoyed without cooling!)

The chocolate dipping part can get kind of messy, and if you're doing it in a warm kitchen, your cookie balls will start to soften before you dip them. In these situations, I recommend getting out a few at a time, and letting the rest stay in the fridge until you're ready for them.

Once the chocolate has hardened, they are ready to eat! Enjoy!


Just be careful about getting cookie all over your face;-)


May 16, 2010

Butterfly Garden Cupcakes

This week, my husband came home with two new cupcake books for me to explore. One, "What's New, Cupcake?" is the follow-up to a book my mom got me, "Hello, Cupcake." These books show fun ways to decorate cupcakes for all sorts of occasions - baby showers, birthdays, holidays, pranks, etc. While they contain a few basic recipes, they're mainly full of edible decorative schemes. I realized, upon receiving the follow-up book, that I haven't made a lot of the designs form the first book. I found this awesome cookie dough cupcake recipe (to be posted soon), and decided to top these new cupcakes with a butterfly design found in "Hello, Cupcake." This turned out to be quite the endeavor. 

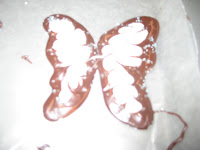
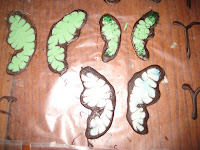
First, I had to make the wings of the butterfly. This involved lots of melting chocolate. Using an outline from the book, I piped the outline of the wings in dark chocolate melting wafers (which apparently work better than regular/"real" dark chocolate because it hardens faster and maintains its consistency pretty well when melted). Then, I filled in the wings with the color of my choice. The book recommended orange, so the butterflies would look like monarchs, but all I had was white and green. Once the outline was filled in (a technique I learned is called "flooding"), I took a toothpick and gently tried to bring some of the dark chocolate into the center to create the wing look. This took some practice - especially learning how long I had before the outline began to set. The first few looked a little "chunky" in the middle, because the melted chocolate had already started to harden by the time I started mixing. And while the wings are still melted and just beginning to set, I sprinkled some colored sugar and nonpareils on the tips for added effect (again, in the book, these are white to assist with the monarch look, but I just went with what I had). I then piped some chocolate antenna.


Once the cupcakes were cool, I frosted them in several colors (vanilla frosting tinted with my coloring gels), and then attempted to apply the wings. Placing a chocolate chip about 1/4 inch apart on the top, I propped the wings against the chocolate chips and piped a chocolate frosting body down the center. I didn't have much luck with the antenna turning out well, so a few of the butterflies have the antenna and most don't. Also, some of the wings oozed together during the cooling process, so for those the "complete" butterfly is just lying flat on top of the cupcake, instead of with its wings pointed up.
But most of them are flapping. Of course, there was the occasional casualty:

But in the end, most of the cupcakes turned out... well, if not perfect, then at least passable. 


I learned, in the end, that the thick chocolate fudgy frosting does a much better job at holding the wings in an upright position - but since I didn't discover this until the last four or five cupcakes, I guess I'll just have to keep my fingers crossed to see if they all survive the ride to work in the morning!

("Hello, Cupcake" is written by Karen Tack & Alan Richardson, and published by Houghton Mifflin. It, as well as "What's New, Cupcake" contain many playful ideas that are supposed to be "easy," but it would appear that my patience level and/or skill level are rather sub-par. I'm hoping to overcome that soon!)

May 2, 2010

Snickers Cupcakes

Pictured above are my attempts at making "peanut cupcakes with nougat-chocolate frosting" - basically, cupcakes that are supposed to taste like Snickers. Again using a recipe from the Food Network magazine, this was a messy and time-consuming recipe, but hopefully worth it!

CUPCAKES:
2 1/2 cups all-purpose flour
2 1/4 teaspoons baking powder
1/2 teaspoon salt
3 large eggs, room temp
3/4 cup granulated sugar
1/2 cup packed light brown sugar
10 tablespoons unsalted butter, melted
1 tablespoon vanilla extract
3/4 cups whole milk
2 cups chopped salted roasted peanuts, plus more for garnish

NOUGAT FROSTING:
2-13 ounce jars marshmallow creme (about 4 cups)
1/2 cup creamy peanut butter
pinch of salt

CHOCOLATE FROSTING:
6 ounces milk chocolate, chopped
4 ounces semisweet chocolate, chopped
2 1/2 cups confectioner's sugar
1/4 cup whole milk
1 stick unsalted butter, softened
1 tablespoon vanilla extract
1/2 teaspoon salt

CUPCAKES:
1) Preheat oven to 350 degrees. Line 24 cupcake tins with paper liners.
2) Whisk flour, baking powder, and salt in a medium bowl.
3) In another bowl, beat eggs and both sugars with a mixer until light and fluffy, about 2 minutes.
4) Gradually beat in the melted butter and vanilla.
5) With mixer on low speed, add half of the flour mixture, the milk, and then the remaining flour.
6) Fold in peanuts but don't overmix.
7) Divide batter evenly among prepared cups, filling each about halfway. Bake about 20-22 minutes, until a toothpick is inserted and comes out clean. Let cool in pans 10 minutes, then transfer to racks to cool completely.

NOUGAT:
1) Beat the marshmallow creme, peanut butter, and salt with a mixer until smooth. Set aside.

CHOCOLATE FROSTING:
1) Put both chocolates in a large microwave safe bowl and microwave on 50 percent power until soft, about  minute. Stir, then continue to microwave until melted, 1-2 more minutes.
2) Add the confectioner's sugar, milk, butter, vanilla and salt and beat with a mixer until smooth and creamy.

Spread nougat frosting over each cupcakes, then top with chocolate frosting, leaving some of the nougat exposed. Garnish with peanuts.

Just a word of caution - once on the cupcake, the nougat spreads out and takes over everything. Trust me, I made a nice big mess! Use a little less nougat topping than you think you should, because no matter how sturdy it looks in the bowl, once it's on the cupcakes it's going to spread out like The Blob. Well, a very tasty Blob. :-) Happy eating!